本帖最后由 合伙人 于 2013-11-9 00:19 编辑
把3d打印机改为镭射切割机资料教程 佢demo cut 1/32" (0.8mm)飞机木, 用的系 "455nm component laser diode", 2W Driving Broad (唔等於支laser有2W). 居然卖USD224?! 我地有淘宝真幸褔
不过想买Laser Cut的师兄可睇下佢个demo video, 保証你心都凉埋, 只系2W cut 木就已经.... 家中有老虎的保証立即被大悲咒封印
这件嘢根本得啖笑, cut出来条边又粗...得1mm飞机木切能, 唔好话cut, 用来雕都唔知雕到咩. 但系佢个video就系一个好好example, 2W laser cut 0.8mm木已经咁大烟.... 比想系家中供奉Laser cut的师兄们(包括我)一盆冷水
佢太贪心, 其实如果demo cut 纸 / 雕机壳好过, 起码靚仔先 不过即系千几银买把介刀
BTW, 你整咁多3DP, 不如搵隻改做CNC router啦~ 多样嘢玩嘛
Who doesn’t want to add laser capability to their 3D Printer? Here at the J Tech Photonics Lab we have been tinkering with upgrading our 3D printer used for rapid prototyping to also have laser cutting and engraving capabilities. This can be used for many fun projects as well as useful manufacturing projects like cutting solder stencils for PCBs (as seen in the video above). Setting up the Hardware: Basically, we took our 455nm component laser diode and mounted it in front of our plastic extruder. You can find the printable parts on Thingiverse (part 156753). Then we hooked up the laser with it’s included Mini Fit Jr. connector to the 2 Amp Laser Driver Board output (the laser comes standard with this cable in our kits). The signal for the automated build platform motor on the MakerBot heated build platform circuit board is connected to the input of the driver board using a custom cable. This signal needs to be inverted, so the jumper on the Laser Driver Board needs to be set appropriately. 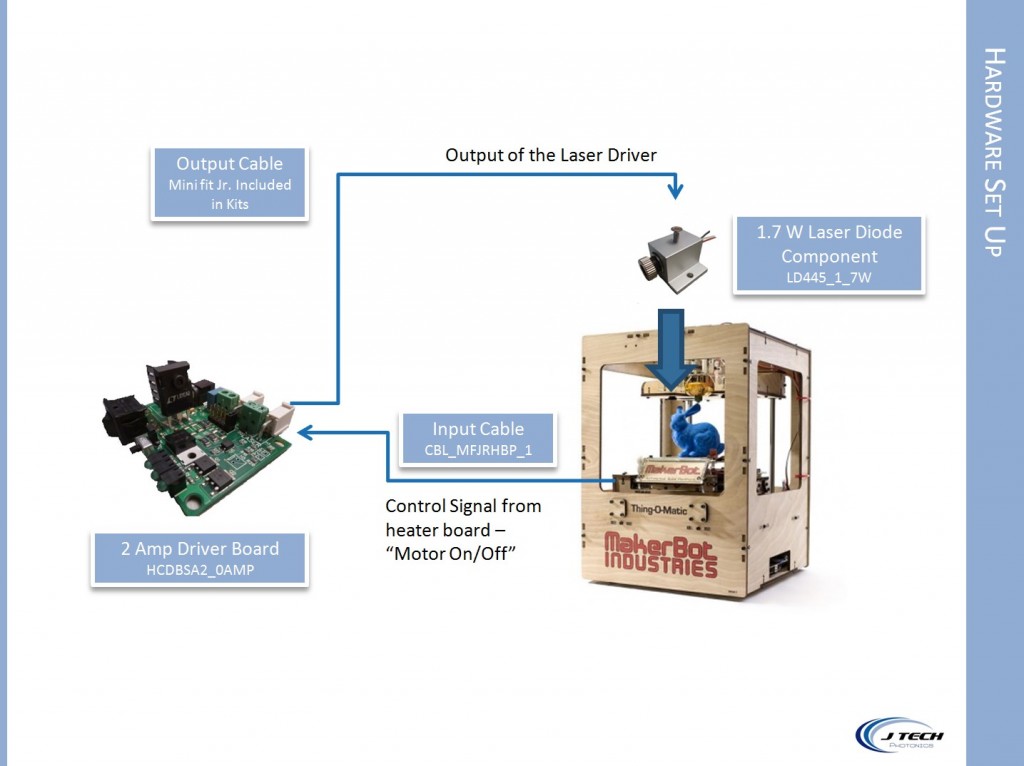
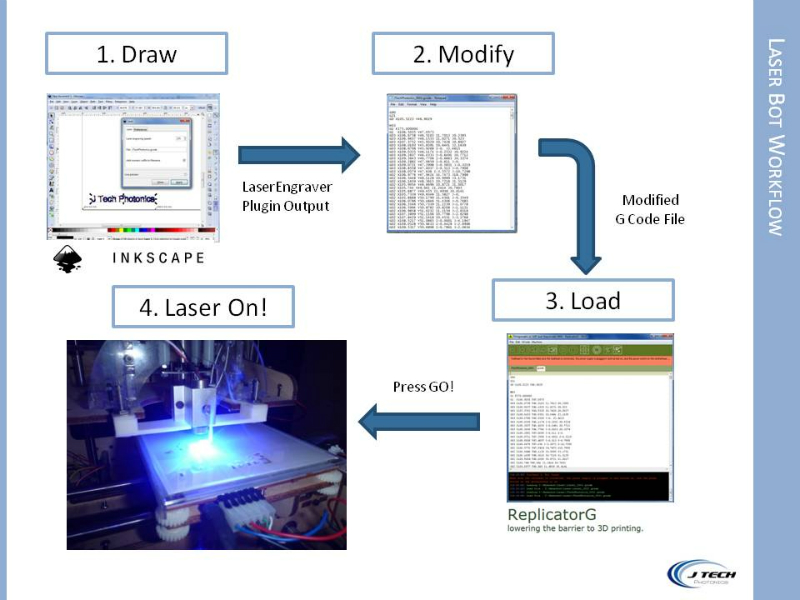
How it All Works – The WorkFlow Diagram Once you get all of the mechanical figured out, it is pretty easy to get everything going. The basic workflow is: Draw: Use a drawing program that will output G Code files based on path objects. Corel Draw and other fancy programs will do this. Inkscape has an open source free program that does the job. Just remember to get the”LaserEngraver” plugin to convert to G Code. Modify: Use an editor to modify the G Code file to turn on and off the laser. The “On” command is M106. The “Off” command is M107. It also might be usefull in developing a process to have a “pause” command after turning on the laser and the next command to move. This gives the material a bit of time to heat up before moving. Load: Load the G Code file into Replicator G and you are ready to go! Press the “build” button and the process should start. 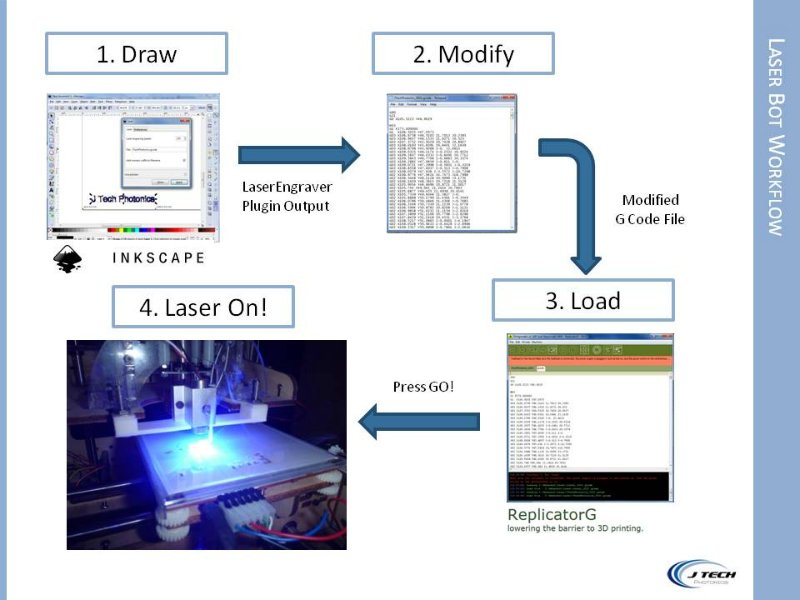 Check back for more projects and instructions on how to create your own solder stencils using this laser cutter! Buy your laser upgrade kit now!
Some examples of cutting using the upgrade kit:This will work on other printers as well!The laser upgrade kit only needs a single output from the printer to tell the laser to turn on and off. There are plenty of options to use. One of the easiest is to use the signal for the motor on the extruder. Jumper it over to the laser driver board as an input. Take the cable that is the “forward” signal and the “ground” signal and put it into the control input of the laser board. If the printer is based off of G Code and M codes from Replicator, then a command of: - M101 Extruder on, fwd (to turn on the laser)
- M103 Extruder off (to turn off the laser)
You can then modify your G Code files to do whatever you want to. If you use a drawing program like inkscape and the output is in G Code you can then convert them to the MakerWare x3g format using the converter found on thingiverse part 81425 here. Printers successfully upgraded with this kit include:- Makerbot CupCake
- Makerbot Thing-o-matic
- Makerbot Replicator
- Makerbot Replicator 2
- Makerbot Replicator 2x
- Felix Printers
- RepRap Printers (many different ones using the RAMPS controller)
Disclaimer The laser used in this project is very powerful and all safety precautions must be taken. Use proper safety eyewear to prevent injury to eyes. This is a project and J Tech Photonics, Inc. is not responsible or liable for any and all damage or injury caused to people or property. The use of these instructions to make a laser cutter is under your own discretion and all safety precautions should be followed.
| 


 京公网安备11010802043351